A beginner's step-by-step guide to start using Docker Containers for Data Science development and avoid complex Python environment managers

Introduction
Docker containers provide a lightweight and efficient way to package and deploy applications, making it easier to move them between different environments, such as development, testing, and production. However, while Docker is widely used for deployment, it has been underutilized by developers for their day-to-day work. Many developers still rely on traditional local development environments that can be difficult to set up, maintain, and share with others. This can lead to issues with version conflicts, dependencies, and different operating systems, which can slow down the development process and make it harder to collaborate with others.
A few months ago, I wrote an article entitled ‘Why You Should Use Devcontainers for Your Geospatial Development’ , where I discussed the advantages of using VSCode’s Devcontainers for geospatial development over traditional local Python environments. Most of this was motivated by the complex dependencies that exist in specialized geospatial libraries. Since then, I have continued to develop using Devcontainers for most of my work, but I recently had to reformat my notebook, which gave me the opportunity to start fresh. After installing Windows 11 and Ubuntu 22.04, I decided not to install anything related to Python, such as Conda, VirtualEnv, or Miniconda. Instead, I opted for Git and Docker, and as I will show here, we don’t even need VSCode, although I recommend it as a full-fledged IDE if you are doing more than just data analysis.
Since adopting Docker for my development work, I have found it to be a game-changer. By using Docker containers, I am able to quickly and easily set up and manage my development environment without the hassle of dealing with conflicting dependencies and setup issues. In fact, I recently wrapped my package in a production container ready for deployment, and the process was smooth and painless. Docker has truly simplified my development process and allowed me to focus more on coding and less on setup and configuration.
Even if you are an absolute beginner and it seems intimidating at first sight, don’t worry; we will show you how simple it can be with this step-by-step guide. Moreover, managing Python environments can also be intimidating, and there is no simple “roll-back” as we have with Docker, where we can just recreate the image. A wrong install command on the “base” environment can mess up all other environments, and it can be a difficult bug to track.
So, let’s go to the tutorial.
Install Docker and Git
The first step is to install Docker and Git in the host computer. If you are using windows, I suggest installing their GUIs (Docker desktop and Git GUI), as it is easier and they configure all the dependencies automatically.
Now, we have to make sure Docker engine is up and running. On windows, we can open Docker Desktop and check for the status bar (should be green if it is running) on the lower left corner (Figure 1).

Using Official Jupyter Docker image
Next, we need a Docker image. Rather than diving into the complexities of a Dockerfile, it’s easier to quickly search for an image on Docker Hub (http://hub.docker.com), which offers images for all kinds of needs and flavors. Even if a specific image doesn’t have all the dependencies you need, you can add more later.
If we search for Python, the first result will be the Python official image. However, this is a minimal installation of Python and does not come with Jupyter or other data science packages. Instead, we are going to search for Jupyter and select the jupyter/datascience-notebook image (shown in Figure 2).

To pull it from Docker Hub we can just type the following commands.
docker pull jupyter/datascience-notebookRun Jupyter within the Container
Once the image is downloaded, we can build a container from it. There are two important points to keep in mind:
Forwarding the listening port: When we run the container, we need to bind the port that Jupyter will be using from the host machine to the container. This can be achieved with the -p argument, like so: -p 8888:8888. This means that any attempt to access the host port 8888 will be forwarded to the same port within the container
Binding a local folder: In order to save the notebooks to the host machine, we need to bind a local folder to a path within the container. This can be done using the -v option. In this case, since the Jupyter image starts the server on the /home/jovyan/, we will bind our local folder to this target using the following argument -v d:/Projects:/home/jovyan/projects.
Now it’s time to run the container:
docker run -it -p 8888:8888 -v d:/Projects:/home/jovyan/projects jupyter/datascience-notebookOnce we run it, it will automatically start a Jupyter server and display the listening address and token (Figure 3).

Now, we can open the browser on the host machine, copy and paste this last line with the token and Jupyter (Lab in this case) will be available with all the packages and without the hassle of managing complex Conda environments (Figure 4). Note that the projects folder is there, pointing to the projects on the host machine.

Installing extra packages
This image comes with the basics, for data science, such as Pandas, Numpy, Scipy, Scikit-Learn, Scikit-Image, etc. If you need something else, such as for example Plotly or Pyjson, you can install directly from a notebook cell:
%pip install pyjson5Alternatively, you can open a terminal windows from the top menu File/New/Terminal, and you will have the whole linux machine running on the Docker Container available for you with the advantage of not messing around with your host computer (Figure 5).

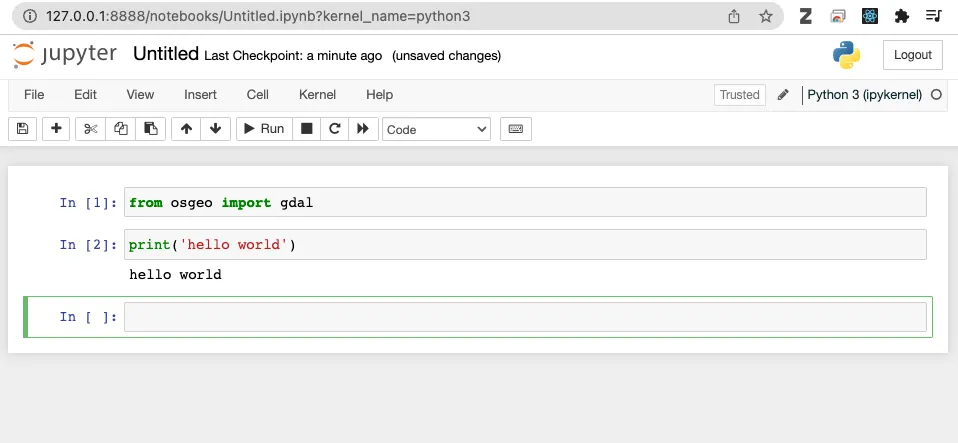
Using a custom Image
The images from jupyter project are already customized to start jupyter notebook automatically when we run the image. But sometimes, as it is my case, I have prepared a minimal docker image that works with geospatial packages such as GDAL that are difficult to install (you can check it in this story: https://medium.com/towards-data-science/configuring-a-minimal-docker-image-for-spatial-analysis-with-python-dc9970ca8a8a). In such scenarios, we can install the jupyter server directly within the container using pip command. Let's see how it works using the minimal image for geospatial analysis
1- Get the Docker Image:
docker pull cordmaur/geospatial_minimal:latest2- Run the container:
To start a container that was not "previously" prepared, we need to take care of the following points:
Expose the port that will be used by jupyter ; and
Forward a host port to the exposed port.
docker run -it --expose=8888 -p 8888:8888 cordmaur/geospatial_minimalOnce inside the container, let's install jupyter and start it. I will install jupyter lab because it already installs notebook as well.
pip install jupyterlabOnce the installation is complete, we can run it. We must take care because we need to force jupyter to listen to all IPs and not only to the lookback interface, otherwise the host computer will not be able to access it correctly. We can do this by passing the --ip=0.0.0.0 configuration, like so:
jupyter notebook --ip=0.0.0.0 --allow-root --no-browserThe --allow-root flag is used to permit its use by the root user and the --no-browser flag prevent it from opening the browser. Now, we can open the browser just as before and try to access the jupyter by using the provided URL (Figure 5).
Conclusion
In conclusion, it is clear that Docker can be a powerful tool for also developers, not just for deploying systems but also for their day-to-day work. By using Docker containers, developers can quickly and easily set up and manage their development environment without the hassle of dealing with conflicting dependencies and setup issues. It simplifies the process of managing Python environments and makes it easier to collaborate with others.
Personally, I have found Docker to be a game-changer in my development work. It has allowed me to focus more on coding and less on setup and configuration, which has increased my productivity and made my work more enjoyable. If you’re an absolute beginner, don’t be intimidated by Docker. This article provides a step-by-step guide to get started, and the benefits are definitely worth it. So, I highly recommend giving Docker a try for your next project.
コメント